Have you ever found yourself juggling important events, deadlines, or a project’s timeline, but struggled to keep everything organized? Visualizing tasks and milestones can make a world of difference—and here’s the good news: Google Docs offers a simple yet effective way to create timelines, no fancy software needed!
Whether you’re managing a project, planning out a semester, or tracking personal goals, timelines help you see the big picture at a glance. They’re great for staying on top of tasks, hitting deadlines, and coordinating with others. And the best part? You can make a timeline in Google Docs, quickly and easily, without needing advanced design tools.
Ready to map out your next project? Let’s dive into how you can create a timeline step-by-step in Google Docs!
 Why Create a Timeline in Google Docs?
Creating timelines is a powerful way to keep track of events, deadlines, and milestones, but why choose Google Docs as your tool for the job? Let’s explore the versatility of Google Docs and the key benefits timelines bring to both personal and professional life.
The Versatility of Google Docs
One of the major reasons why Google Docs stands out is its flexibility and accessibility. Here’s why it’s a great choice for creating timelines:
- Quick access from anywhere with an internet connection: Google Docs lives in the cloud, meaning you can create, edit, and share your timeline from any device with internet access. Whether you’re at home, in the office, or on the go, your timeline is just a few clicks away.
- Simple interface for beginners and advanced users alike: The intuitive design of Google Docs makes it easy for anyone to use. You don’t need to be a graphic designer or tech guru to create a polished, functional timeline. With built-in tools and user-friendly menus, you can create and customize timelines effortlessly.
- Integration with other Google Workspace tools: Google Docs integrates seamlessly with other tools like Google Drive, Sheets, and even Calendar. This means you can embed relevant documents, spreadsheets, or meeting details directly into your timeline, making your project management even more organized and efficient.
Key Benefits of Using Timelines
Why are timelines such an essential tool? Whether for personal organization or professional projects, timelines offer a clear view of your progress and objectives. Here are a few key benefits:
- Visualizing project steps and deadlines: A timeline lets you see each phase of a project at a glance, giving you a clear understanding of when tasks need to be completed. No more guessing or trying to juggle multiple deadlines in your head!
- Keeping everyone on the same page with progress tracking: For team projects, timelines are crucial. They help team members stay aligned by providing a visual reference point for deadlines, responsibilities, and milestones. With a shared timeline, it’s easy to ensure that everyone is working towards the same goals.
- Efficient for personal use (study plans, fitness goals, etc.) or professional use (team project management): Whether you're planning your next big project at work or just organizing your personal goals, timelines help keep you on track. From academic assignments to workout schedules, timelines offer a structured way to manage your time and resources.
Creating a timeline in Google Docs gives you the perfect balance of simplicity and functionality, making it a go-to tool for visual planning and project management.
 Step-by-Step Guide on How to Make a Timeline on Google Docs
Creating a timeline in Google Docs is a straightforward process, and with the right steps, you’ll have a polished and professional-looking timeline in no time. Follow this guide to get started!
Step 1: Start a New Google Docs Document
The first step in creating your timeline is to open Google Docs and set up your workspace:
- Open Google Docs: Head to docs.google.com and sign in with your Google account. If you don’t have one, you can easily create a free account.
- Create a blank document: Click on the “Blank” option to start with a fresh page.
- Set up your workspace: Depending on the complexity of your timeline, consider changing the page orientation. If you have a lot of events or details, switching to landscape mode may give you more horizontal space:
- Click on File > Page setup.
- Choose Landscape if your timeline needs more width, or stick with Portrait for a standard look.
Setting the proper orientation early on will save you time and make it easier to fit your timeline on the page.
Step 2: Insert a Drawing
Google Docs doesn’t have a built-in timeline template, but it provides an easy workaround through the Drawing tool. Here’s how to use it:
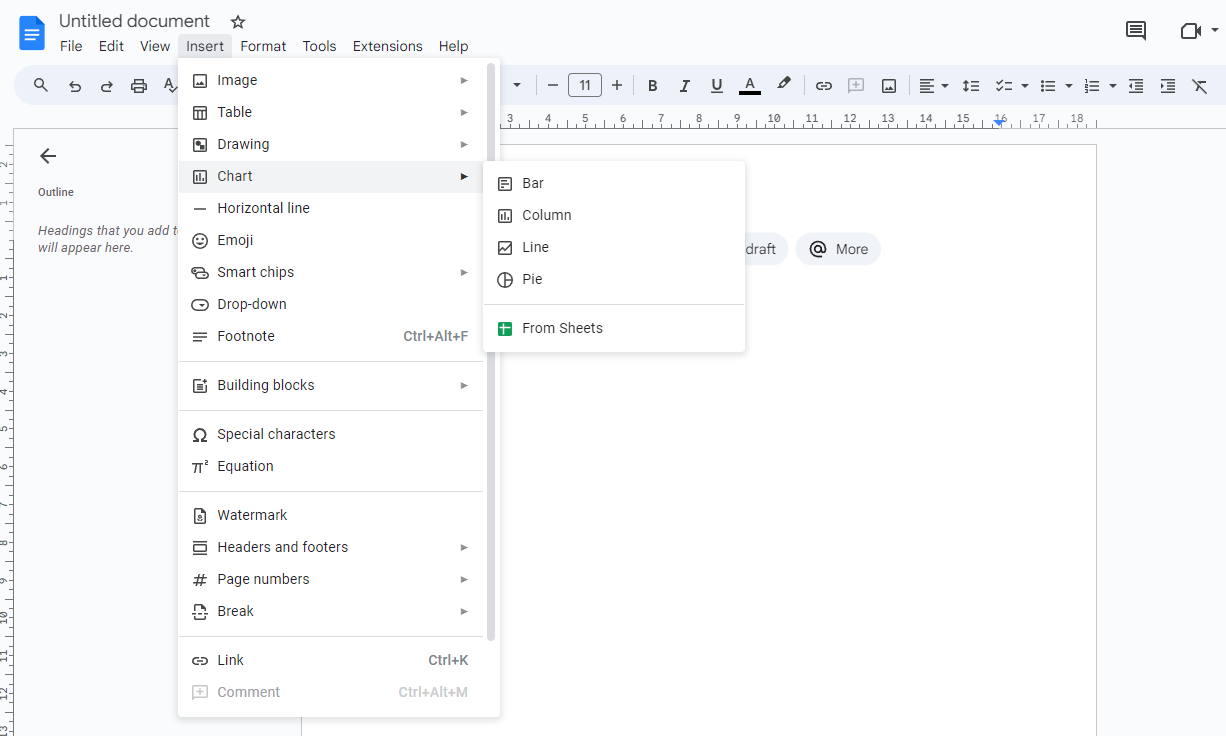
- Access the 'Insert' menu:
- In your Google Doc, go to the top menu and click on Insert.
- From the dropdown, select Drawing > + New.
- Use Google Drawings to create your timeline:
- A drawing canvas will pop up, allowing you to create shapes, lines, and text boxes for your timeline.
- Google Drawings provides basic tools that are perfect for simple designs.
Using Shapes and Lines in Google Drawings
To create a timeline, you’ll mainly be working with shapes and lines:
- Creating rectangles, arrows, and lines:
- Use the Shape tool (a circle and square icon) in the drawing menu to insert rectangles or other shapes. Rectangles can represent events or milestones on your timeline.
- Use the Line tool to connect the shapes, representing the flow of time or sequence of events. You can also insert arrows to show directionality or progression.
- Resizing and aligning elements:
- Click and drag shapes to adjust their size, ensuring they align properly along a straight line or axis.
- Use snap to grid or alignment guides (automatically appearing in Google Drawings) to keep your timeline visually neat and balanced.
- Differentiating events with colors:
- Add visual variety by color-coding different events, tasks, or phases. For example, use blue for completed tasks and red for upcoming deadlines.
- Click on a shape, and use the Fill color tool (paint bucket icon) to customize its color.
Adding Text to Your Timeline
Once you have the basic layout of your timeline, it’s time to label it with dates, descriptions, or events:
- Use text boxes for labeling:
- Click the Text Box tool (T icon) to add labels to your shapes. Drag the text box to where you want it to appear, and type in your event description or milestone.
- Make sure to label both major milestones and smaller events for a comprehensive timeline.
- Enhancing important details:
- Practical tip: Use bold text or different font colors to emphasize important events or deadlines.
- For example, bold the date of a major project deadline, or use a bright color to highlight critical milestones.
Step 3: Adding Visuals and Enhancing Your Timeline
To make your timeline even more engaging, consider adding visuals and additional formatting:
- Incorporating images or icons:
- If you want to make your timeline more visual, add relevant images or icons. For example, use an image of a clock for deadlines or an icon of a milestone marker for completed tasks.
- You can add images by clicking on the Image icon within the Drawing tool and uploading or selecting from Google Drive.
- Using bullet points or numbered lists for simple timelines:
- If you don’t need an elaborate visual timeline, you can simply list events in a linear format using bullet points or numbered lists in the main Google Doc.
- Example:
- January 2024: Project kickoff
- March 2024: First milestone review
- June 2024: Final deliverables due
This option works well for straightforward timelines or when you want to focus more on content than design.
By following these steps, you can create a customized and effective timeline in Google Docs to keep your projects organized and visually appealing.
 Tips for Customizing Your Timeline in Google Docs

Once you’ve created the basic structure of your timeline, it’s time to give it a personal touch. Customization not only enhances its visual appeal but also makes your timeline more effective in communicating important details. Here are some tips for styling and adapting your timeline for different purposes.
Color-coding and Styling Your Timeline
Color is a powerful tool when it comes to organizing and categorizing information, especially in timelines. Using different colors for various stages or tasks can help your timeline stand out and make it easier to follow.
- Color-coding for clarity:
- Use color to categorize different types of events, such as past, present, and future tasks. For example, you can color past events in gray, ongoing tasks in blue, and upcoming milestones in green. This visual distinction helps keep your timeline clear and easy to interpret at a glance.
- If you're managing a project with multiple phases or teams, assign a different color to each phase or team. This way, you can quickly identify which tasks belong to which group.
- Font styles and sizes:
- Vary the font size and style to highlight key details. For example, use bold or italic to emphasize important deadlines, and consider using larger font sizes for the titles of major milestones or project phases.
- Stick with a clean, easy-to-read font for the rest of the text. Google Docs offers several font options, so choose one that fits the tone of your project (professional or casual).
- Alignment and spacing:
- Keeping your timeline aligned and well-spaced contributes to a polished, professional look. Use the alignment tools in Google Drawings to ensure your shapes and text are evenly distributed.
- Don’t overcrowd the timeline with too much information in a small space. If necessary, adjust the spacing between events or resize the shapes to give the timeline more breathing room.
- Line thickness and style:
- Another way to make your timeline visually appealing is by adjusting the line thickness. Use thicker lines for the main timeline and thinner lines for connecting tasks or subtasks. This adds depth and structure to your design.
- You can also experiment with dashed or dotted lines to signify different types of relationships between tasks (e.g., dependencies or optional steps).
Adjusting for Different Uses (Project Management, Event Planning, etc.)
One of the greatest strengths of timelines is their adaptability. Depending on your needs, you can modify the style and layout to suit different contexts—whether for project management, event planning, or educational purposes.
- Educational timelines:
- If you’re creating a timeline for a school project or to track historical events, focus on presenting information in chronological order. Color-coding different eras or major periods can help break down complex subjects.
- For study plans, use the timeline to map out important dates like exams, assignment deadlines, or study sessions. You can categorize subjects or topics by color to ensure you’re covering all areas in your study schedule.
- Corporate timelines:
- For project management or business purposes, timelines can be essential for tracking product launches, marketing campaigns, or sprints in an agile environment. In this case, your timeline might include key phases like planning, development, testing, and release.
- To make the timeline useful for all team members, consider adding key deadlines and deliverables. This can help keep everyone aligned and informed about the project’s progress.
- Event planning timelines:
- Event planning involves coordinating many moving parts—guest lists, venues, catering, entertainment, and more. A timeline for event planning should include not only the event day but also key preparation dates like booking venues, sending invitations, and ordering supplies.
- Make sure to leave space for last-minute changes or unexpected tasks, as flexibility is key when organizing large events.
No matter the use, the flexibility of Google Docs means you can easily customize your timeline to fit the specific needs of any project. With these styling and adjustment tips, your timeline will be visually appealing, well-organized, and ready to keep you on track!
 Alternatives to Creating Timelines on Google Docs
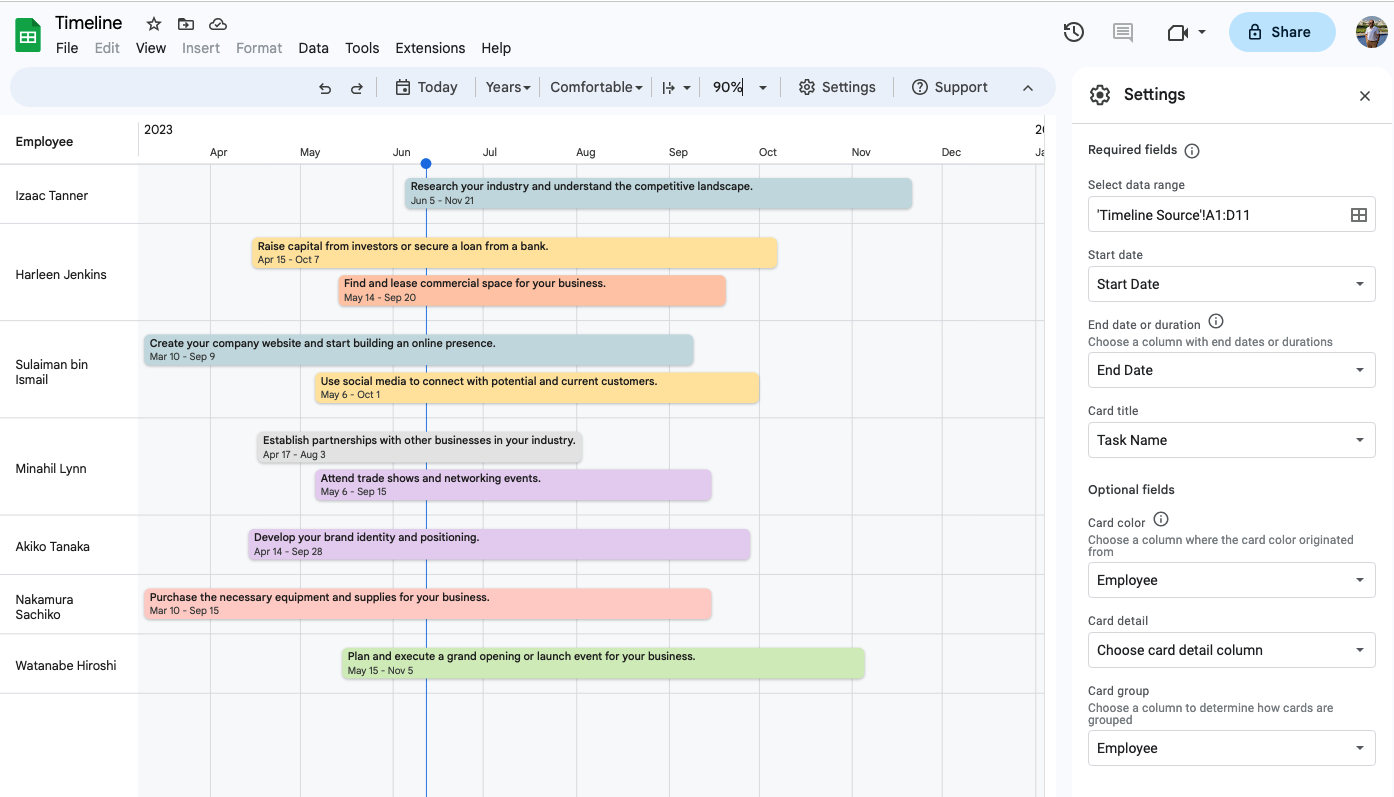
While Google Docs is a great tool for simple timelines, you might need something more advanced or specific depending on your project. Here are a couple of powerful alternatives that offer more functionality for creating detailed timelines.
Google Sheets for More Advanced Timelines
If you’re managing a project with complex dependencies, multiple tasks, or need to track progress over time, Google Sheets can be an excellent alternative. One of the most effective ways to create advanced timelines in Google Sheets is by using Gantt charts, which provide a clear visual representation of your project’s timeline and task dependencies.
- Why Google Sheets?
Google Sheets allows for more precise control over dates, durations, and task progress. Since it’s essentially a spreadsheet, it’s perfect for managing larger data sets, and you can use formulas to automate task tracking and updates. - Creating a Gantt chart in Google Sheets:
- Set up your project data:
Start by entering your task names, start dates, end dates, and durations into the columns of your sheet. This provides the foundation for your Gantt chart. - Use conditional formatting:
To visually represent tasks over time, apply conditional formatting to the cells based on the task’s start and end dates. This will color the corresponding cells to create bars, visually representing the timeline of each task. - Adjust the date range:
You can manually adjust the start and end dates, and the Gantt chart will automatically update to reflect the new timeline. - Customizing the chart:
Add additional data like task dependencies, percent completion, or milestones to further enhance your timeline. You can also apply different colors to indicate progress, such as green for completed tasks or red for overdue tasks.
- Set up your project data:
Using Google Sheets for a timeline gives you a structured way to track project progress, and it’s perfect for more data-heavy projects where you need to see both high-level timelines and specific task details at the same time.

Using Third-Party Tools for Timeline Creation
If you need even more visual detail or complex features that Google Docs or Sheets don’t offer, there are several third-party tools available that specialize in timeline creation. Two of the most popular options are Lucidchart and Canva.
- Lucidchart:
Lucidchart is a powerful diagramming tool that’s perfect for creating timelines, flowcharts, and other visualizations. It’s especially useful for more complex projects that require detailed diagrams or if you want a more professional look.- Why choose Lucidchart?
- It offers more advanced shapes and templates, making it ideal for timelines that need to illustrate complex processes or dependencies.
- Lucidchart’s drag-and-drop interface is user-friendly and intuitive, with a wide range of customization options like shapes, colors, fonts, and lines.
- It integrates well with other productivity tools, including Google Workspace, Microsoft Office, and Slack, allowing for easy collaboration and sharing.
- When to use Lucidchart:
- Use Lucidchart if you need a more professional or detailed timeline than Google Docs or Sheets can provide. It’s ideal for presenting complex information in a clean, visually appealing format for reports, presentations, or team meetings.
- Why choose Lucidchart?
- Canva:
Canva is known for its versatility in creating visually stunning graphics, and it also offers easy-to-use timeline templates. It’s a great option if your primary focus is on design and aesthetics.- Why choose Canva?
- Canva provides numerous pre-made timeline templates, so you can create a polished, attractive timeline in just a few clicks.
- It’s ideal for presentations, marketing materials, or any situation where visual appeal is a priority.
- Canva is extremely user-friendly, with drag-and-drop functionality and customization options for colors, fonts, icons, and more.
- When to use Canva:
- Canva is a great choice for users who want to create timelines that are both functional and visually appealing. It’s perfect for marketing, event planning, or personal projects where design quality is key.
- Why choose Canva?
While Google Docs is a great option for simple timelines, tools like Google Sheets, Lucidchart, and Canva offer more advanced features and customization options to fit different needs. Each tool has its strengths, so choosing the right one depends on your project’s complexity and how visually detailed you need the timeline to be.
 How Edworking Can Help You Manage Timelines and Projects
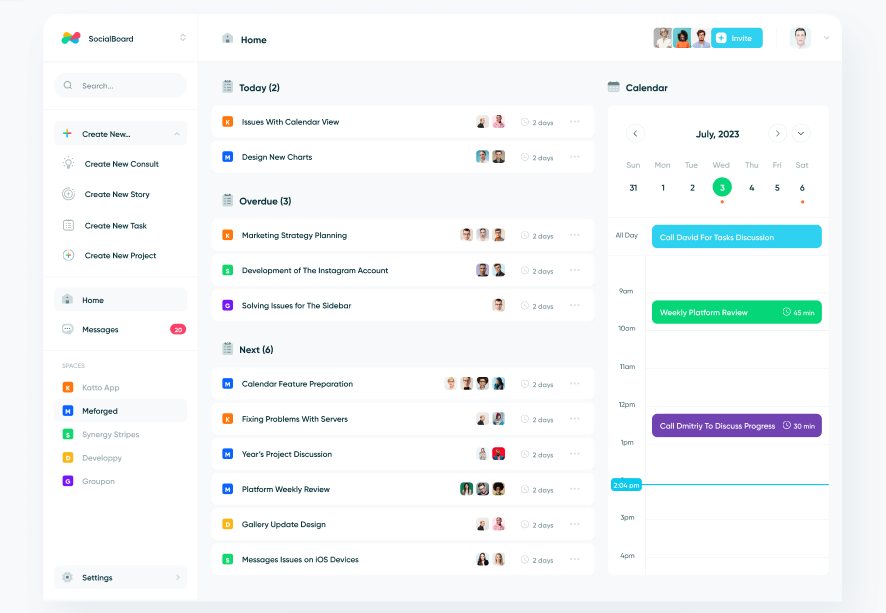
Edworking's Project Management Features
Edworking offers a robust task management system that allows users to track project progress and deadlines with ease. Its Kanban and List Views let you visualize workflows and monitor tasks in real-time, much like a timeline. This feature, combined with customizable task states and seamless integration with chat functions, ensures efficient project coordination. Furthermore, Edworking’s AI tools assist by automatically organizing tasks and suggesting timelines based on deadlines, boosting productivity and accuracy.
Integration with AI and Timelines
Edworking Brain, the platform’s AI tool, plays a pivotal role in managing timelines. It can suggest next steps, track tasks, and provide updates on upcoming milestones, helping users stay organized without manual effort. By analyzing your project’s structure, the AI ensures that your team meets its deadlines and completes tasks in the correct sequence, acting as a digital project assistant to keep everything on track.
 Conclusion
Creating a timeline on Google Docs is simple and versatile when you follow the right steps. Whether you’re organizing personal projects or managing professional deadlines, Google Docs offers a flexible solution that doesn’t require complex tools. From inserting drawings to customizing with colors and text, the process is intuitive and can fit various needs.
Timelines are excellent tools for staying organized and keeping track of important milestones. Give it a try in your own projects, and see how much more productive and streamlined your planning can become!


